
Make Loan Payment Here
.png)
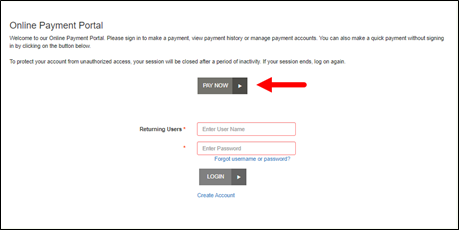
Making a Quick Pay Payment
- From the Biller Direct Online Payment Portal URL, click Pay Now
 .
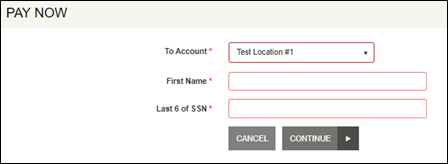
. - When the PAY NOW screen appears:
- If multiple accounts are available, select the account where the funds will be sent (from the To Account drop-down list).
- Enter the validation criteria into the remaining fields on the screen. (Validation criteria is specified by your merchant.)
- Click Continue.
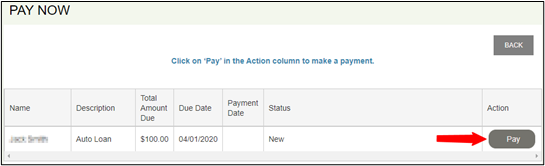
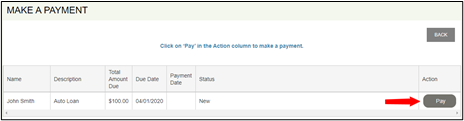
3. When the next screen appears, click the Pay button for the bill you wish to pay.
4. Select a payment option for your selected bill.
NOTE: Your payment options will vary, depending on how your merchant sets them up.
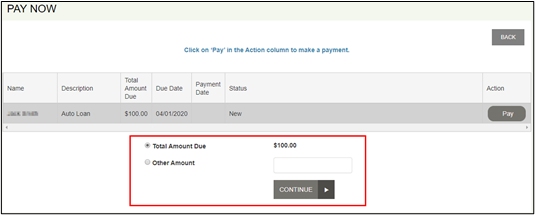
5. If there is a payment amount required for your selection, key your desired amount into the empty field.
6. Click Continue.
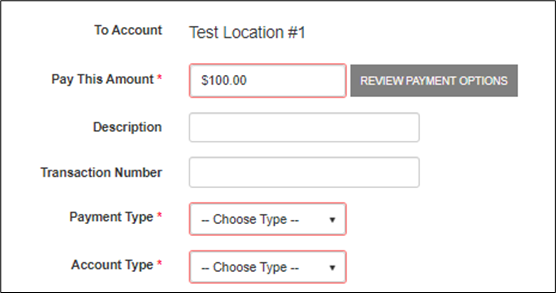
7. When the next screen appears:
a. If the Description and Transaction Number fields appear, they are optional.
b. Select a Payment Type. The payment types available are set up by the merchant.
c. Select an Account Type.
NOTE: The Review Payment Options button (shown below) will return you to the previous screen.
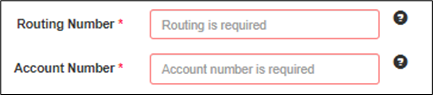
8. Depending on the payment type selected, you will either enter a valid routing number and account number or a credit card number. (For this example, a checking account was selected, so the Routing Number and Account Number fields appear.)
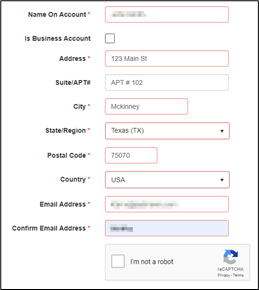
9. The information that appears on the remaining part of the screen comes from the billing file.
a. Confirm that the correct information appears for all fields.
b. If this is a business account, select the Is Business Account check box.
c. Type the email address into the Confirm Email Address field.
d. If Register and Save Payment Information has been enabled by the merchant, you can register your information for future payment convenience.
NOTE: Depending on how your financial institution has set up Biller Direct, fields may be optional, required, or hidden.
e. If CAPTCHA has been enabled by your financial institution during setup, select the I’m not a robot check box and then follow the prompts. (CAPTCHA is an added security measure to prevent bots from registering in the system.)
10. To finalize the transaction, click Continue.
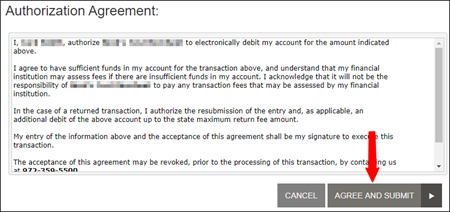
11. When the confirmation screen appears:
a. Verify that all information on the screen is correct.
b. Scroll down to the Authorization Agreement portion of the screen and select Agree and Submit.
NOTE: If your payment method is a credit card, additional text authorizing storing the card information for future use also appears.
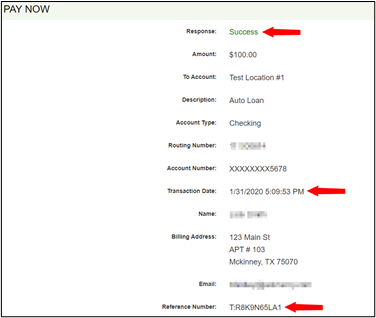
12. When the next screen appears, if the transaction was successful, the following will appear:
a. A response status of Success
b. A transaction date and time
c. A reference number for the payment
13. Scroll down to view the following options:
a. Close closes the current window.
b. Save Receipt gives you the option of saving the electronic copy of the receipt.
c. Print Receipt allows you to print a paper copy of the receipt.
d. View Bills returns you to the payment portal URL.

Registering for an End User Account
If enabled for the site, end users can register for an account in the SmartPay Biller Direct payment portal to view their bills, manage payment methods, and run reports of past transactions.
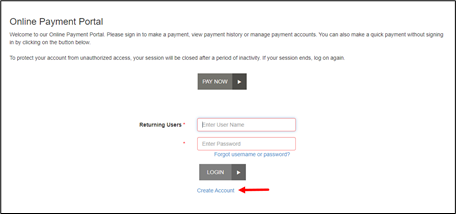
1. From the Biller Direct Online Payment Portal URL, click Create Account.
2.When the User Registration screen appears:
a. Select an account from the To Account drop-down menu.
b. Enter the validation criteria in the fields that appear. The required criteria are set up by the merchant and may differ from the image
below.
3. Click Continue.
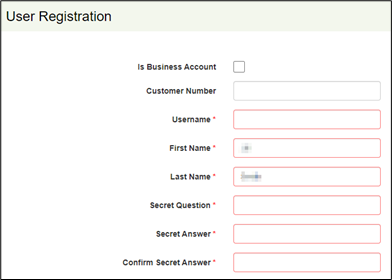
4. When the User Registration screen appears, required fields are identified with an asterisk (*) beside the entry field name. Prefilled data is imported from the billing file:
NOTE: Depending on how the financial institution has set up Biller Direct, fields may be optional, required, or hidden.
a. If this is a business account, select the Is Business Account check box.
b. In this example, the Customer Number field is optional.
c. Enter a Username that is easy to remember. This Username is used to access the payment portal.
NOTE: EPS recommends using your email address for the username.
d. The First Name and Last Name values are prefilled.
e. The Secret Question will be used if you forget your password and need to have it reset. The answer to the Secret Question is case sensitive.
5. In the middle portion of the User Registration screen, verify that the information in the required fields is accurate.
- Additional fields may be added by the merchant (for example, social security number, phone number, driver’s license, or customer number).
-In this example, Suite/APT# and Phone are both optional.
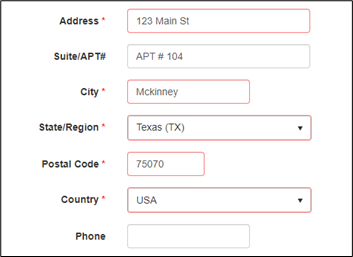
6. In the bottom portion of the User Registration screen, verify the address by entering it once and then confirm the email address by entering it again.
a. In this example, Drivers License, DL State, and Social Security are optional.
b. If CAPTCHA has been enabled by the financial institution during setup, select the I’m not a robot check box and the follow the prompts. CAPTCHA is an added security measure to prevent bots from registering in the system.
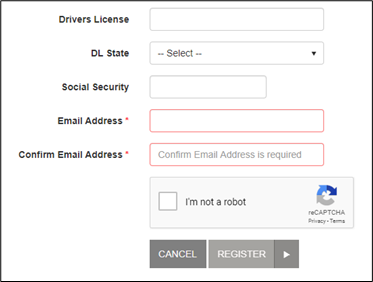
7. Click Register.
8. When the User Registration Confirmation screen appears, open your email inbox for the account you used to register on the payment portal.
a. Open the account registration email message from your financial institution.
b. Click the URL link to proceed with creating your new password.
NOTE: Because this link is temporary and will expire in 24 hours, you must perform this step immediately.

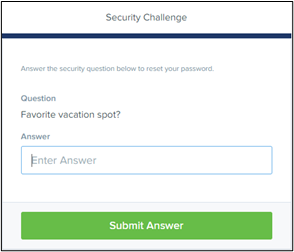
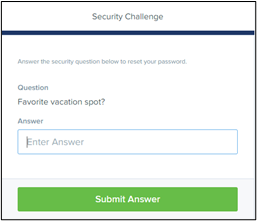
9. When the Security Challenge screen appears (in your web browser):
a. Enter the secret answer that you used for your security question previously during registration. The answer is case sensitive.
b. Click Submit Answer.
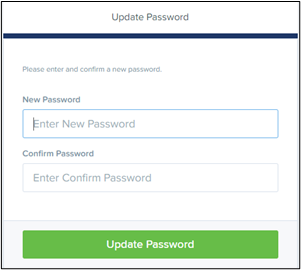
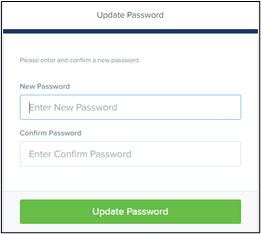
10. When the Update Password screen appears:
a. Enter a new password for your payment portal access into the New Password field.
b. Enter the same password into the Confirm Password field.
c. Click Update Password.
NOTE: Passwords must contain numbers and upper- and lowercase characters, be at least eight characters long, and must not contain the user name.
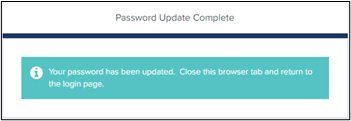
11. When the Password Update Complete screen appears, the registration process is complete. You may go to the payment portal URL and log in normally using your new username and password.
Resetting Your Password
If you forget your password, you can reset it through the payment portal.
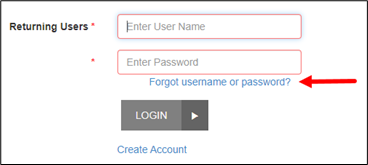
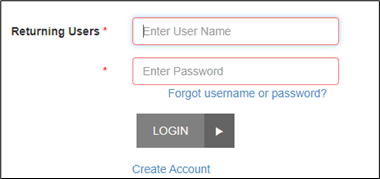
1. From the payment portal URL, click Forgot username or password.
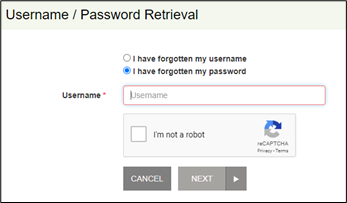
2. When the Username / Password Retrieval screen appears:
a. Verify that the I have forgotten my password option is selected.
b. Enter your username into the Username field.
c. If CAPTCHA has been enabled by the financial institution during setup, select the I’m not a robot check box and then follow the prompts. (CAPTCHA is an added security measure to prevent bots from registering in the system.)
d. Click Next.
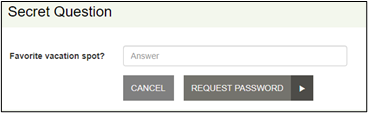
1. When the Secret Question screen appears:
a. Enter the answer to the secret question. (You set this up during account registration.)
b. Click Request Password.
2. When the Forgot Password Confirmation screen appears, go to your email inbox for the account you used to register on the payment portal.
a. Open the Password Reset Request email message from your FI.
b. Click the URL link to proceed with creating your new password.
NOTE: Because this link is temporary and will expire in one hour, you must perform this step immediately.
 22
22
3. When the Security Challenge screen appears (in your web browser):
a. Enter the secret answer that you used for your security question previously during registration. The answer is case sensitive.
b. Click Submit Answer
4. When the Update Password screen appears:
a. Enter a new password for your payment portal access into the New Password field.
b. Enter the same password into the Confirm Password field.
c. Click Update Password.
NOTE: Passwords must contain upper- and lowercase characters and numbers, be at least eight characters long, and must not contain the user name.
5. When the Password Update Complete screen appears, you may go to the payment portal URL and log in normally using your new password.
Set Up a Single Payment
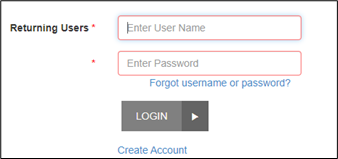
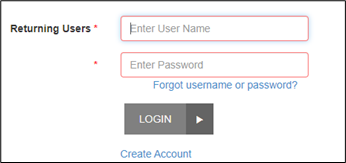
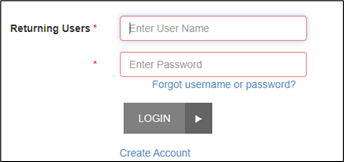
1. From the payment portal URL, enter your user name and password and then click Login.
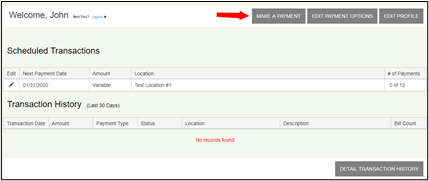
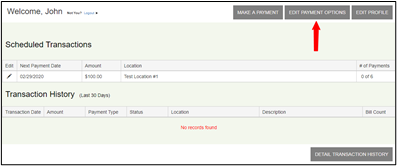
1. When the Welcome screen appears, select Make A Payment.

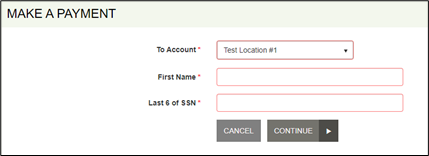
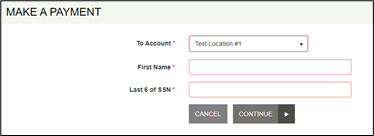
2. When the Make a Payment screen appears:
a. Select an account from the drop-down list.
b. If additional validation fields appear, complete the validation criteria.
i. This is set up by the merchant and may be different from the image below.
c. Click Continue.
3. As shown below, select the Pay button for the bill you want to set up with a single payment.
4. Select the amount you want to make recurring. If you select Other Amount, you must key the desired dollar amount.
5. Click Continue.
6. When the next screen appears:
a. Verify that the desired payment amount is correct.
b. Select an account from the Pay from Account drop-down list.
c. If Description and Transaction Number appear, they are both are optional.
d. Depending on the payment method, additional fields may appear.
(Example: If you select a checking account as your account type, the optional Check Number field appears.)
7. Click Continue.
8. When the Confirmation screen appears, verify all information on the screen is accurate and then click Agree And Submit.
9. When the Transaction Receipt screen appears, scroll down to view the following options:
a. Close closes the current window.
b. Save Receipt gives you the option of saving the electronic copy of the receipt.
c. Print Receipt allows you to print a paper copy of the receipt.
d. View Bills returns you to the payment portal URL.

Set Up a Recurring Payment
If enabled by the financial institution, registered users can set up a recurring payment.
1. From the payment portal URL, enter your user name and password and then click Login.
2. When the Welcome screen appears, select Make A Payment.
3. When the Make a Payment screen appears:
a. Select an account from the drop-down list.
b. If additional validation fields appear, complete the validation criteria. (This is set up by the merchant and may be different from the image below.)
c. Click Continue.
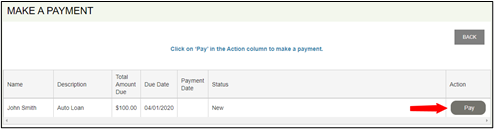
4. As shown below, select the Pay button for the bill you want to set up with a recurring payment.
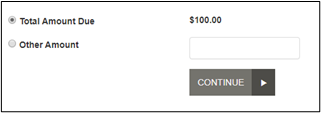
5. Select the amount you want to make recurring. If you select Other Amount, you must key the desired dollar amount.
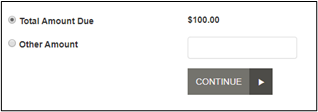
6. Click Continue.
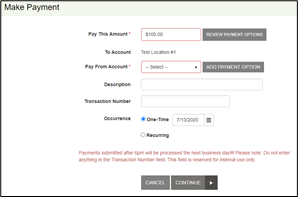
7. When the next screen appears:
a. Verify the desired payment amount is correct.
b. Select an account from the Pay from Account drop-down list.
c. If Description and Transaction Number appear, they are both are optional.
d. Depending on the payment method, additional fields may appear.
(Example: If you select a checking account as your account type, the optional Check Number field appears.)

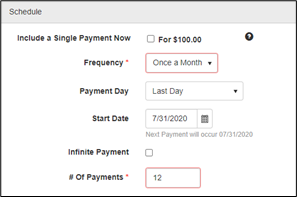
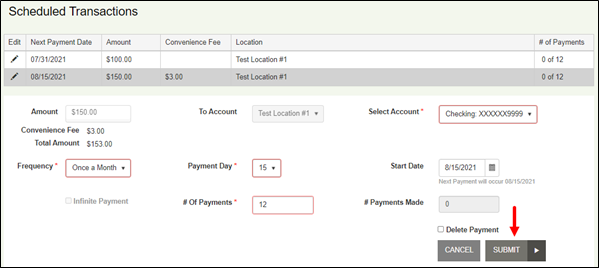
8. Select Recurring to reveal the recurring schedule and amount fields.
9. For the Schedule fields:
a. You can make a single payment at the same time you set up the recurring payment. If you choose to make a payment now, the recurring schedule will still process on the next payment date.
b. Choose a Frequency from the drop-down list. This determines what Payment Day and Start Day options appear.
c. Select a Payment Day. This is the day of the month to process the transaction.
d. The Start Date changes to align with the frequency and payment day selected.
e. If you want the payments to continue indefinitely, select Infinite Payment.
f. If a limited number of payments is desired, key the number of payments into the # Of Payments field.
NOTE: The default number of payments is 12.
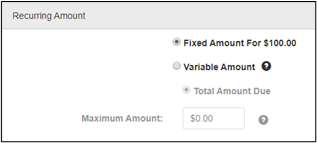
10. For the Recurring Amount fields:
a. The Recurring Amount section only appears when variable recurring payments have been enabled by the financial institution.
b. If Variable Amount option is selected, the transaction amount depends on the merchant’s billing file (with up to three payment amounts presented).
c. The Maximum Amount option allows you to limit the amount that can be processed, regardless of the amount that appears in the billing file.
11. Click Continue.
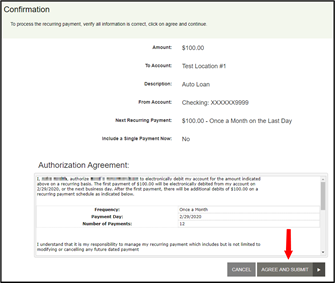
12. When the Confirmation screen appears, verify all information on the screen is accurate and then click Agree And Submit.
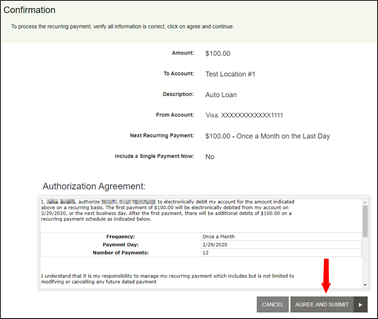
NOTE: Depending on the payment method selected, your Authorization Agreement may include include a recurring convenience fee.
13. When the Transaction Receipt screen appears, scroll down to view the following options:
a. Close closes the current window.
b. Save Receipt gives you the option of saving the electronic copy of the receipt.
c. Print Receipt allows you to print a paper copy of the receipt.
d. View Bills returns you to the payment portal URL.

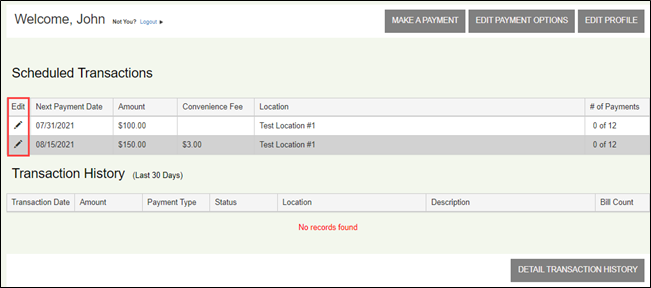
Canceling a Scheduled Payment
Follow the steps below to cancel a recurring payment.
1. From the payment portal URL, key your user name and password and then click Login.

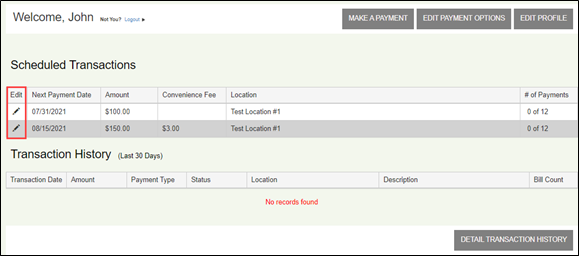
2. In the Scheduled Transactions section, click Edit for the transaction you want to cancel.
3. In the Scheduled Transactions section, click the Delete Payment check box for the transaction you want to cancel.
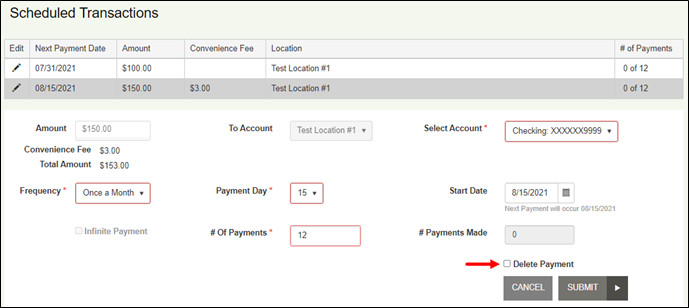
4. Click Submit. The modified transaction will now appear on the screen.
Editing a Scheduled Recurring Payment
Scheduled recurring payments can be edited using the steps below:
1. From the payment portal URL, enter your user name and password and then click Login.
2. In the Scheduled Transactions section, click Edit for the transaction you want to modify.
3. In the Scheduled Transactions section that appears, make your needed changes and then click Submit.
Editing Payment Options
If enabled by the merchant, payment options can be edited using the steps below:
1. From the payment portal URL, enter your user name and password and then click Login.
2. Click Edit Payment Options at the top of the screen.
3. When the next screen appears, scroll down to the Payment Options section.
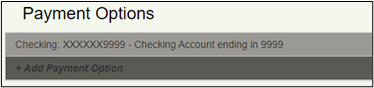
4. To modify existing payment options:
a. Click anywhere on the row of the existing payment method.
b. Make the necessary changes.
c. Click Update. Required fields are identified with an asterisk (*).

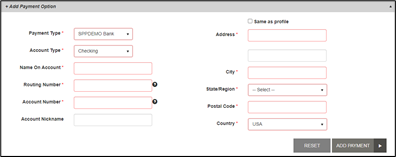
5. To add a new payment option:
a. Click Add Payment Option.
b. Select a Payment Type from the drop-down list.
c. Select an Account Type from the drop-down list.
d. Fill in all required fields (identified with an asterisk (*) beside the field name).
e. Click Add Payment.
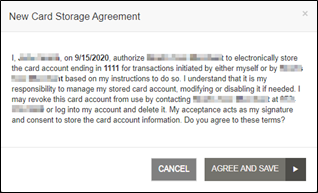
6. If your payment method is a credit card, you will see the New Card Storage Agreement prompt. You must select Agree and Save to proceed.
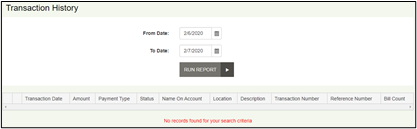
Viewing Transaction History
View the payment history using the steps below:
1. From the payment portal URL, enter your user name and password and then click Login.
2. When the Welcome screen appears, the Transaction History for the last 30 days appears.
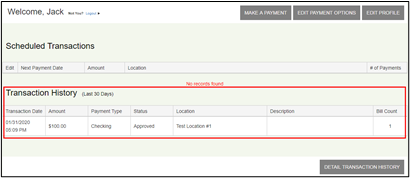
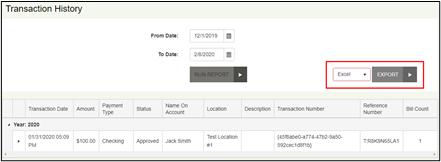
3. To view transactions from a wider range than 30 days:
a. Click Detail Transaction History.
b. Choose your new date range using the From Date and To Date fields.
c. Click Run Report.
4. When the transaction results appear on the screen, you can save the results by selecting a format from the drop-down list and then clicking Export (shown below).